Swans are amazing and beautiful birds that have been a symbol of lasting love for many years. That's why they often decorate the tops of wedding cakes. In order not to order these cute figures from unfamiliar chefs, you can easily make them yourself. If you don’t yet know how to make swans from mastic, this article will definitely come in handy.
How to make a passport cake
Preparing a passport cake will not take much time if you already have experience in preparing pastries. The easiest way is to make a sponge cake with butter cream, but decorating the “cover” will require a little effort. It can be made using the same cream, only you need to add red food coloring to it, which will resemble the most important document. Another option is to cover the cake with fondant of the same color.
The cake can be prepared not only with sponge cake, but also with any other one: honey, with soufflé, with cookie crust, shortbread, and so on. The main thing is that you have a rectangular shape and food coloring on hand to help reproduce the shape of the document. Several simple recipes with a set of ordinary ingredients will help you prepare such a culinary masterpiece.
Traditional and original options
The classic way to decorate a cake with letters is cream. It's easy to prepare, even easier to handle, and the results are attractive.
The only disadvantage of lace letters is that you will have to write the initials by hand, and this does not always work out well. To avoid mistakes, some couples prefer letters made of fondant or marzipan.
You can also come up with original options, for example, using a stencil with initials cut out in it, sprinkle the top of the dessert with coconut flakes or colored confectionery confetti.
Attention! If the initials are inedible, then they can be made together with silhouettes of the bride and groom, flowers or butterflies.
From cream
- Time: 30 minutes.
- Number of servings: 5 persons.
- Calorie content of the dish: 1200 kcal/100 g.
- Purpose: for breakfast.
- Cuisine: Russian.
- Difficulty: easy.
You can make a beautiful cover for your cake using a cream one. To do this, you will need a dye with which you will paint part of the cream red. The letters can also be written with the same cream, painting them yellow. Use only food coloring. The base of the cake can be the same sponge cake described in the previous recipe. It is generally very versatile and suitable for making completely different cakes, soaks well and can be cut.
Ingredients:
For the cakes:
- eggs – 6 pcs.;
- flour – 220 g;
- sugar – 200 g;
- salt - a pinch;
- baking powder – 5 g;
- cocoa – 3 tbsp. l.;
- for cream
- condensed milk – 1 b.;
- butter – 300 g;
- walnuts – 100 g;
- jam for soaking;
- coloring powder – red and yellow.
Cooking method:
- Make the cakes as described above, adding cocoa powder while beating.
- Once they are ready, prepare the cream. To do this, mix condensed milk with softened butter with a mixer for 4-7 minutes. Divide into 3 parts: the first is slightly more than half, the second is 2/3 of the remainder and the third is the smallest part.
- Soak the cakes with jam. To do this, mix 3 tbsp. l. jam with water and pour over the cakes.
- Distribute half of the cream between the cakes.
- Color the second part red with food coloring.
- Distribute the cream over the top tier and along the left end. This will be your cover.
- Spread the third part over the remaining ends - these will be the pages. For plausibility, you can run a fork over them, marking each page.
- The inscription on the cake can be made from the remaining cream, painted yellow.
We select the method depending on the type of cake
First, you need to pay attention to the shape of the dessert. It will be difficult to write anything on top of domed products, cones and irregularly shaped cakes. It is necessary to initially take into account complex geometry. At the same time, the same ganache or topping can simply drip off. In these cases, it is wiser to choose:
- solid volumetric letters made of cooled chocolate, marzipan, fondant;
- toppers;
- options for prefabricated inscriptions from marshmallows and nuts.
You can always add additional decoration to the side. For example, lay out or draw a gold inscription on a chocolate plate and stick it to the surface with cream or glaze.
No less important is the material of the cake coating and its internal consistency. The choice of inscription method largely depends on these characteristics.
On mastic
The mastic coating is dense, dry and does not tolerate water at all. Therefore, aqueous creams and jams cannot be used. Laying a pattern on the surface with sprinkles and fruits is also quite problematic. Likewise, you don’t want to tear the coating with toppers or vertical inscriptions.
The problem is solved with the help of chocolate or sugar glaze, icing. The inscription can also be made with food markers. If you draw contours on the mastic using a needle, you can paint the letters with a brush using gel dyes or an alcohol mixture with kandurin. Or you can simply sculpt letters from the remaining mastic and write on the surface.
On cheesecake and mousse cakes
In this case, the problem is the opposite. The mousse base of the cake is very delicate, it can be easily damaged by carelessly pressing hard inscriptions. It is better to make a coating of chocolate, transparent isomalt glaze on top of the cheesecake or apply a layer of jam or cream, to which the text of the inscription will already be attached. Large volumetric numbers and letters are placed only on plastic skewers resting on the bottom of the cake. Otherwise, they may simply drown.
On Napoleon and honey cake
The main problem with these cakes is the uneven surface due to the crumb coating. The topping or cream will lie unevenly. The impression of the inscription will be blurry. The same applies to dense flat letters. If you lay them horizontally, gaps will appear.
In this case, the most optimal solution is toppers and signs on the side of Napoleon and honey cake. You can also decorate the cake with a panel of glazed nuts or coconut or poppy seed sprinkles.
From mastic
- Time: 30 minutes.
- Number of servings: 5 persons.
- Calorie content of the dish: 1200 kcal/100 g.
- Purpose: for breakfast.
- Cuisine: Russian.
- Difficulty: easy.
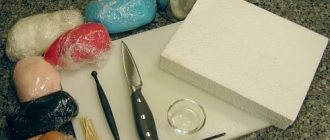
A passport cake made from fondant will turn receiving a document into a real celebration. The cooking process consists of three steps: cakes, cream, mastic. The most difficult thing is to assemble all the components and turn them into a passport, but detailed instructions will help you cope even with this task. To make mastic, choose chewy marshmallow candies. This way you will get a very tasty “cover”. You can also use Russian versions, such as “Bon Paris”, but the mastic will not be as tender.
- for cakes
- eggs – 6 pcs.;
- flour – 220 g;
- sugar – 200 g;
- salt - a pinch;
- baking powder – 5 g;
- for cream
- condensed milk – 1 b.;
- butter – 300 g;
- walnuts – 100 g;
- for mastic
- marshmallows – 200 g;
- powdered sugar – 300 g;
- butter – 100 g;
- red and yellow food coloring.
- Turn on the oven and preheat it to 180 degrees.
- Refrigerate the eggs if they were stored at room temperature.
- Beat the whites and yolks separately, then mix by adding sugar and salt.
- Gradually add flour and baking powder.
- Once the dough is ready, grease a deep baking tray with vegetable oil or line it with baking paper.
- Pour the dough and spread evenly over the entire surface of the baking sheet.
- Place the baking sheet in the oven and leave for 30-40 minutes. Check the readiness of the cake with a match or a toothpick: pierce the cake; if the match comes out dry, then everything is ready. Take out the biscuit, cut in half and cool.
- For the cream, take softened butter and beat with condensed milk.
- Chop the nuts in a way convenient for you and add to the cream.
- For mastic, you need to melt the candies and butter in any way convenient for you.
- Add sifted powder to the hot mass, mix and replace the sweet dough.
- Paint 2/3 of the mastic red. To do this, dip a toothpick in the dye and make several punctures in the dough. Knead and then roll into a thin rectangle with a rolling pin.
- Cover the cake: left edge and top. Remove excess mastic with a knife.
- Make letters from the rest of the mastic, first painting it yellow.
- Place the mastic into the syringe and carefully write the word “Passport” on the cake.
Secrets of beautiful inscriptions
To ensure that the letters in the congratulations are even and neat, you must follow certain rules for applying them to the surface of the cake:
- It is ideal to apply the drawing mass on a flat and smooth surface - mastic, chocolate glaze.
- The surface should be slightly sticky, but not wet. Therefore, if the inscription is created on chocolate icing, refrigerate the cake after finishing the design.
- Use special devices. Optimally - a pastry bag or syringe. The nozzle should be narrow, otherwise the letters will be fuzzy and blurry.
- The congratulation itself should be concise and complete. If the entire surface of the cake is “strewn” with letters, it will be difficult to read the wish.
- Naturally, mistakes and blots are unacceptable.
- The font is simple, without lots of curls, and quite large.
- Place the offer evenly - either strictly in the center of the cake, or along the edges.
- Choose a contrasting mass for application. For example, on dark glaze, letters in white, yellow, and milky colors would be appropriate, and on light mastic, black and brown colors would be appropriate.
If this is your first time making a congratulatory wish on a cake, you can first practice on a regular sheet of parchment. Try to arrange the words so that they are unhyphenated and the letters are the same size. Other decorations - cream borders, decoration with figures, flowers - are done after creating the inscription. The printed letters can be adjusted. If any letter is missing or part of the word is blurred, carefully remove the damaged part and correct it.
Passport Cake Recipes
If the housewife has a signature cake recipe that always turns out perfect, then it’s quite possible to use it. Only the shape of the treat should be rectangular. For those who have never prepared such culinary masterpieces before, there are a lot of simple recipes that everyone can handle. Be patient and have the right ingredients, and follow every step of the instructions to get the most delicious passport cake of your child’s life.
- Time: 30 minutes.
- Number of servings: 5 persons.
- Purpose: for breakfast.
- Cuisine: Russian.
- Difficulty: easy.
A passport cake made from fondant will turn receiving a document into a real celebration. The cooking process consists of three steps: cakes, cream, mastic. The most difficult thing is to assemble all the components and turn them into a passport, but detailed instructions will help you cope even with this task. To make mastic, choose chewy marshmallow candies. This way you will get a very tasty “cover”. You can also use Russian versions, such as “Bon Paris”, but the mastic will not be as tender.
Ingredients:
- for cakes
- eggs – 6 pcs.;
- flour – 220 g;
- sugar – 200 g;
- salt - a pinch;
- baking powder – 5 g;
- for cream
- condensed milk – 1 b.;
- butter – 300 g;
- walnuts – 100 g;
- for mastic
- marshmallows – 200 g;
- powdered sugar – 300 g;
- butter – 100 g;
- red and yellow food coloring.
Cooking method:
- Turn on the oven and preheat it to 180 degrees.
- Refrigerate the eggs if they were stored at room temperature.
- Beat the whites and yolks separately, then mix by adding sugar and salt.
- Gradually add flour and baking powder.
- Once the dough is ready, grease a deep baking tray with vegetable oil or line it with baking paper.
- Pour the dough and spread evenly over the entire surface of the baking sheet.
- Place the baking sheet in the oven and leave for 30-40 minutes. Check the readiness of the cake with a match or a toothpick: pierce the cake; if the match comes out dry, then everything is ready. Take out the biscuit, cut in half and cool.
- For the cream, take softened butter and beat with condensed milk.
- Chop the nuts in a way convenient for you and add to the cream.
- For mastic, you need to melt the candies and butter in any way convenient for you.
- Add sifted powder to the hot mass, mix and replace the sweet dough.
- Paint 2/3 of the mastic red. To do this, dip a toothpick in the dye and make several punctures in the dough. Knead and then roll into a thin rectangle with a rolling pin.
- Cover the cake: left edge and top. Remove excess mastic with a knife.
- Make letters from the rest of the mastic, first painting it yellow.
- Place the mastic into the syringe and carefully write the word “Passport” on the cake.
Coloring lace decor
To get snow-white lace for your cake, use titanium dioxide. Without it, you will get a decoration of a dirty yellow color - this is exactly the natural shade of pectin and corn starch dissolved in water.
If you are going to prepare colored lace decor, then now is the time to color it. You can choose a dye to suit your taste, as long as it is water soluble.
Decide for yourself how much dye you need depending on the desired color saturation. Start with a small amount and add more if necessary. Mix the lace dough thoroughly until the paint is completely dissolved.
What do we offer?
Our catalog contains dozens of photos of “Passport” cakes. You can choose any of these design options or offer your own. It could be a funny stylization, or it could be the most accurate sweet copy of a passport. So accurate that only too large sizes can distinguish it from the original. A custom-made cake in the form of a passport can be made in the form of a closed document or an open one. In the latter case, we will exactly imitate its first page and even post an edible photo of the hero of the occasion. For this purpose, a special confectionery printer with edible ink and sugar paper will be used. A 14th birthday cake can have any size and weight. As a rule, they are determined based on the number of guests who will be present at the celebration. Most often people order from us single-tier rectangular-shaped confectionery products - however, options with several tiers are also possible, on the top of which we place a sweet copy of the passport. The “Passport” cake can be made without mastic. We will decorate it with the most delicate cream, berries and a congratulatory inscription! Variations on the theme of a foreign passport or a passport of a citizen of the world are also possible.
Summary
When choosing a way to decorate a wedding cake, do not neglect the classic options - they never go out of style. Future newlyweds can make initials for the main dessert at the banquet on their own, without going to a pastry shop. This will add personality to the cake and highlight the couple's creativity.
admin 115
Previous article
Don Corleone and his friends - bride ransom in mafia style: script, competitions and props
Next article
Icing: recipe, master class on preparing protein mass
When they see the final results, many people have doubts as to whether they can make such a decoration with their own hands. To this I would like to say one thing: if you don’t try, you won’t know.
In general, it should be noted that icing for cakes, as well as other confectionery products, is not as difficult to do as it seems from the very beginning. The main thing is to strictly comply with all prescription requirements. Otherwise, the protein mass will not reach the consistency that is essential for preparing various laces and patterns.
So, icing, the photo of which is presented in this article, requires the use of the following products:
- fresh chicken egg white – 1 pc.;
- sifted sugar powder - approximately 250 g;
- fresh lemon juice or dry citric acid - about ½ dessert spoon;
- strong glucose solution - dessert spoon (use as desired).
What is it used for?
As you can see, icing for lace (the protein mass recipe was discussed above) does not require the use of many expensive and rare products. It is made from quite affordable and simple ingredients that are available to every housewife.
So why is such a mass needed at all? As a rule, it is used to prepare unusual patterns for decorating cakes and pastries. Although chefs often use sweet rice mixture to create their own dessert. In this case, various figures and patterns are made from icing. If you decide to please your loved ones with an original sweet, we suggest creating a Christmas tree, various animals, snowflakes, etc.
Ingredients:
- Egg – 5 pieces
- Wheat flour - 250 grams
- Butter - 325 grams (300 grams for biscuit, 25 grams for cream)
- Cocoa – 50 grams
- Sugar - 350 grams (200 grams for biscuit, 150 grams for cream)
- Baking powder – 1 piece
- Cream - 400 Milliliters (200 for mousse, 200 for ganache)
- White chocolate – 150 grams
- Raspberries – 300 grams
- Leaf gelatin – 3 pieces
- Mastic - To taste
Number of servings: 10
34